Season’s greetings
Around this season, there are many things to be done, and reaching out to old friends and colleagues is an important time-honored tradition. As I recently found out that preparing the list and addressing the cards can be a major challenge, especially for someone like my 83-year-old Grandma.
Holiday card…and it should read Dunder and Blixem.
To help her for the coming years, I made a new address list using pictures taken with her Ipad mini. I faced a couple challenges to getting to a nice enough looking printable list that I decided I should share the process here.
Preparing photos from addressed cards
Having consistent, well-lit photos is the key to later having nice address list. To do this, I put together a photo box using a fruit crate (basically a 3-sided box) in which a hole was cut to allow the iPad mini camera to shoot below. The surface below was well-lit using a desk lamp. Tape markings were used to consistently place the cards.
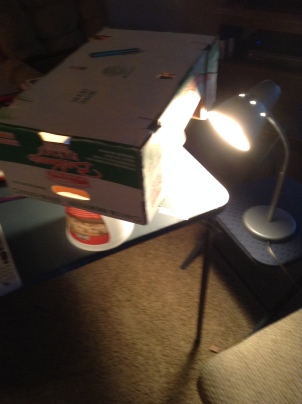
Basic lightbox
From photo to address list
After moving photos onto my computer, I need to crop them to size, fix discoloration, and size the pictures to fit into my list.
I cropped the photos to just the address manually in the Office Picture Manager. Also rotating the photos as necessary.
Most of the pictures has a grayish background which needed removing before they would be printable. I found that `convert` from ImageMagick did a reasonably good job of removing this discoloration. Using the command line, you can automate this task for all the photos.
convert *.jpg -auto-level -white-threshold 78% x-%04d.jpg
I found that 58% worked well for my photos, but you can adjust as needed.


The last part was getting all the addresses into a list in Word. On first try the pictures were too large, so again using the picture manager, the photos were reduced to 30% of the original size. The first thing I figured out was that the image size was way too big. Back in the picture manager, I resized them all to 30% their original size. The next issue was how to get all these pictures to the same width in Word.
Adjusting the picture width in Word was tedious, but a bulk solution was not apparent. It became much easier once I learned about the <F4> key function. I’d recently learned that it can be used to repeat the last action for Excel, and also Word. To use it here first I selected the size of the first picture (3.5 in width; lock relative dimensions), and after I select the next picture hitting <F4> repeats the resizing.
Future holidays
In the end, I have a list of all the cards that went out this year. No digging in address books or in my Grandma’s case through several years of earlier lists. For those that are more technically-inclined, this is a nice starting point to digitize your card list and this same process can be followed with return addresses of cards you received this year.
